Sunday 19 August 2018

Cherry Ice Cream

Much to my surprise, the British summer is still here, and with no sign of respite from the heat, I made another batch of ice cream! Normally, when you think of cherry flavoured anything, you think of something very sweet and fruity and maybe a bit sour, but I wanted this ice cream to be a bit more subtle and refreshing. This is why I added very little sugar and I also didn't cook the cherries prior to mixing them with the rest of the ingredients. Because of the acid in the cherries, the mixture does split a little bit, but I found that it didn't affect the taste or texture in any noticeable way. Anyway, I hope you enjoy the recipe and remember to stay hydrated!


Cherry Ice Cream
Bare Necessities
350g/3cups/12.5oz Frozen Cherries
250ml/8.5fl.oz Milk
250ml/8.5fl.oz Double Cream
50g/1.75oz Sugar
2tsp Vanilla Essence

1. Pour all of the ingredients into a saucepan and stir on a low heat until the sugar has dissolved and the cherries are soft. Feel free to squish a few to let out some of the flavour.
2. Set the mixture aside for 5-10 minutes to allow it to cool.
3. Pour the mixture into your ice cream machine and freeze according to your manufacturer's instructions.
4. Pour the ice cream into tupperware boxes and freeze for 2-3 hours or until ready to serve.
5. Serve up and enjoy!

Saturday 7 July 2018

Dairy-Free Vegan Coconut and Chocolate Swirl Ice Cream

Nowadays, more and more people are choosing to avoid dairy; either for dietary or environmental reasons, so I thought I would have a go at a vegan ice cream. Now, in hindsight, the ice cream I made wasn't totally vegan as there were milk solids in the chocolate, but you could easily avoid this by choosing vegan or dark chocolate instead! I must say that this ice cream was so unexpectedly light and creamy and delicious that I'm definitely going to be using a coconut base for more ice creams in the future!


Coconut and Chocolate Swirl Ice Cream
Bare Necessities
400ml Full-Fat Coconut Milk
250ml Coconut Cream
100g Sugar
2tsp Vanilla Essence
150g Cooking Chocolate

1. Pour milk, cream, sugar and vanilla into a saucepan and stir on a low heat until the sugar has dissolved.
2. Take off the heat and allow the mixture to cool for 5-10 minutes.
3. Pour the mixture into an ice cream machine and follow your manufacturer's instructions.
4. Once the ice cream is nearly done, melt 100g of the chocolate and slowly drizzle it into the mixture whilst stirring.
5. Once finished, put the ice cream into tupperware boxes to put into the freezer.
6. Before you put the ice cream into the freezer, melt the remaining 50g of chocolate and drizzle it on top of the ice cream.
7. Pop the ice cream in the freezer to chill for a few hours before serving.
8. Serve up and enjoy!

Wednesday 4 July 2018

Turkey Gyoza

As a lover of Asian food, it has been a lifelong goal of mine to make gyoza or dumplings, but I've always been put off from the idea because of how complex the list of ingredients can be. However, now that I've got a bit more free time on my hands, and two really good Chinese supermarkets within walking distance of where I live, I figured now was the time to give them a go. I was originally going to do chicken dumplings but my local supermarket didn't have any chicken mince, so I opted for turkey dumplings instead. You'll be pleased to know that I was able to find all bar one of these ingredients at my local Asda, and you can find pre-made gyoza skins at pretty much any Asian supermarket. With the garlic and ginger, I used the frozen, pre-chopped variety, just because it lasts so much longer so I don't have to worry about wasting it, but fresh would work just as well.

As for folding the dumplings, I figured that trying to explain it to you in the instructions would be confusing, so here is a link to a YouTube video explaining how to do it. When sealing the dumplings, I mixed a teaspoon of cornflour into a glass of water, as I think it helps seal the dumpling pastry together a bit better.


Turkey Gyoza (makes approx 45 dumplings)
Bare Necessities
250g Turkey Mince
120g Savoy Cabbage (approx 3 leaves)
140g Water Chestnuts (drained weight)
2 Spring Onions
1tsp Garlic (approx 1-2 cloves)
1tsp Ginger
4tsp Soy Sauce
2tsp Worcester Sauce
2tsp Sesame Oil
pinch Pepper
45 Dumpling Skins
1tsp Cornflour

1. Loosely chop the cabbage, water chestnuts, spring onions, garlic and ginger into small chunks.
2. In a large bowl, mix together all the ingredients (except for the dumpling skins and cornflour) until fully combined.
3. Lightly dust your hands and a plate with cornflour and then make the dumplings according to the video (or however you like to make your dumplings).
4. Pop the dumplings into the fridge or freezer until ready to cook. If you are cooking from frozen, make sure to cook the dumplings for several minutes extra.
5. When you are ready to cook the dumplings, pour a small amount of oil onto a non-stick pan and allow it to heat up slightly.
6. Place as many dumplings on the pan as will fit without allowing them to touch, and let them fry for two minutes.
7. Without moving the dumplings, pour enough water in the frying pan to partially submerge the dumplings by about 2cm and cover for 3-5 minutes.
8. Uncover the frying pan and continue to cook the dumplings until all the water has boiled off.
9. Serve up and enjoy!

Monday 2 July 2018

Mojito Sorbet

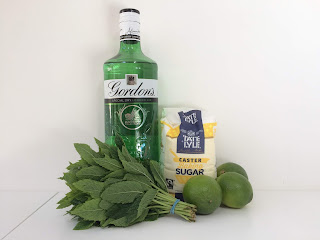
This week I moved out of uni for the final time, and whilst I am looking for a job, I'm also taking some time to relax and recharge after a very exhausting end of term/year/degree. So, what's the best way to relax in the summer sun? Stay inside and make sorbet of course! Though this isn't *technically* a mojito sorbet as I used gin instead of white rum, it tastes like one so that's good enough for me!


Mojito Sorbet
Bare Necessities
60ml Gin/White Rum
175ml Lime Juice (approx 6 Limes)
Zest of 2 Limes
150g Sugar
30g Mint Leaves
560ml Water

1. In a saucepan, stir in all of the ingredients and gently heat until the sugar has dissolved.
2. Remove from the heat and cover for a few minutes to allow the mint to steep.
3. Strain the mixture through a sieve into a jug, making sure to squeeze all of the liquid out of the mint leaves.
4. Pour the mixture into your ice cream machine and freeze according to your manufacturer's settings.
5. Once frozen, pop the sorbet into the freezer for a couple hours to allow it to chill fully.
6. Serve up and enjoy!

Saturday 28 April 2018

A Nice Useful Cake

Ok, so I'll be honest with you guys. When I started choosing vintage recipes for my final major project, I wanted to choose recipes that I hadn't heard of before, but also that looked enticing and, most importantly, yummy. Looking at the recipe, these cake seemed fairly ordinary, but I just couldn't resist making a cake who's title was its purpose, not its flavour. Now, the original recipe calls for candied peel and currants, but I'm not a big fan of candied peel, so I followed the instructions at the end of the recipe that went as follows: "The currants and candied peel may be omitted, and a little lemon or almond flavouring substituted for them: made in this manner, the cake will be found very good." And it was indeed a good cake! Granted, it is very large and a little denser than your modern day cake but served warm with a little cream, it was actually very nice, and not overpoweringly sweet. Not only this, but the chopped almonds provided a nice texture that you don't usually get in cakes.

Here is the original recipe that I was working with:


A Nice Useful Cake
Bare Necessities:
4oz/115g Butter
4oz/115g Sugar
1/2tsp Lemon Essence
1lb/450g Plain Flour
2tsp Baking Powder
3 Eggs
1cup/8fl.oz/250ml Milk
2oz/60g Chopped Almonds

1. Pre-heat the oven to 320F/160C.
2. Grease and line a cake tin.
3. Mix together all of the ingredients until fully combined and well mixed.
4. Pour the mixture into the tin.
5. Pop it in the oven for 45 minutes or until golden brown and cooked through.
6. Slice up and enjoy!

Wednesday 11 April 2018

Caraway Seed Cake

I should say now that I love caraway seeds. They have this inexplicable, somewhat medicinal taste, and I just love it baked into bread. I should also say that, until now, I regarded this as a purely savoury spice, so when I saw this recipe for a sweet cake flavoured with caraway seeds, I knew I had to try it. Right up until the cake went in the oven, I could smell the caraway seeds and I was convinced it wasn't going to work. But once it started cooking, the smell changed to what I can only describe as a sweet version of the original caraway smell. This cake has a really subtle, yet incredibly addictive taste to it and I had two slices before I'd even finished cleaning up!

Here's the original recipe I was working with:

Caraway Seed Cake
Bare Necessities:
8oz/225g Plain Flour
4oz/115g Butter
4oz/115g Sugar
2 Eggs
2tsp Caraway Seeds
1tsp Baking Powder
1tbsp Milk

1. Pre-heat the oven to 320F/160C.
2. Grease and line a cake tin.
3. Cream together the butter and sugar.
4. Gradually beat in the eggs and milk.
5. Stir in the flour, baking powder and caraway seeds until fully combined.
6. Pour the mixture into a tin and pop in the oven for 40 minutes or until golden brown and cooked through.
7. Slice up and enjoy!


Wednesday 28 March 2018

Banana Blanc Mange

Blanc Mange is basically Europe's answer to pudding and I love it. Not only that, but as I have proved in previous posts, I love banana, so this was an obvious recipe for me to do. I actually found this recipe from a recipe book that presumably came with a fridge-freezer many years ago, back when people didn't really know how to use such mod-cons. Most of the recipe book is filled with enough jellied meat recipes to make you feel sick, but this one was actually rather delicious. Note that once made, these should be eaten within two days. I apologise for the brown banana chunks in the photo of the finished blancmange, I forgot to take a picture of it until the following day!

Here is the original recipe I was working with:


Banana Blanc Mange (makes 4 desserts)
Bare Necessities:
3 Bananas
1oz/30g Corn Flour
1 Egg Yolk
1pint/2cups/500ml Milk
1oz/30g Sugar
1/2tsp Vanilla Essence

1. Pour the milk into a saucepan with the sugar and slowly bring to the boil.
2. Remove from the heat and stir in the cornflour, careful to remove any lumps.
3. Place back on the hob and cook on a low heat for 10 minutes, stirring continuously.
4. Take off the heat and let it cool for a couple minutes.
5. Chop the bananas into small chunks.
6. Stir an egg yolk into the milk mixture and then stir over a low heat for another 2 minutes.
7. Take off the heat and stir in the chopped bananas and the vanilla.
8. Pour into small pots or ramekins and leave to cool in the fridge.
9. Once chilled, serve and enjoy!